
Follow World 1 in the original SNES version of Super Mario World 2: Yoshi’s Island. Finish each course with thirty stars, twenty red coins and five flowers for one hundred points. Collect all three requirements in the same clear; separate attempts do not combine their counts.
The full-size maps below show the course branches and collectible positions. Open a map to inspect a narrow passage, and open the accompanying video when you need to see a timed jump in motion.
World 1-1 — Make Eggs, Throw Eggs
Swallow a Shy-Guy and press Down to make an egg. Take the flower above the first small rock, then shoot the Winged Cloud to build the staircase. Its upper ledges hold six red coins and the second flower. Hit the star cloud carried by the Fly Guy before returning to the pipe guarded by two Wild Piranhas.
Enter that pipe. The underground room contains two red coins carried by Fly Guys and six in the upper coin row. Roll the Chomp Rock beneath the high ledge to reach them. Back outside, collect the third flower immediately left of the exit pipe. Clear the Piranhas beneath the rotating platform for four more red coins and the fourth flower.
Hit the later vine cloud, climb up and collect the final two red coins around the upper rotating platform. Shoot the flower cloud to the left of the vine before rolling the next Chomp Rock toward the goal. There is no Middle Ring in this course: finish with thirty stars rather than expecting a checkpoint refill.
Stage map: open to enlarge.

World 1-2 — Watch Out Below!
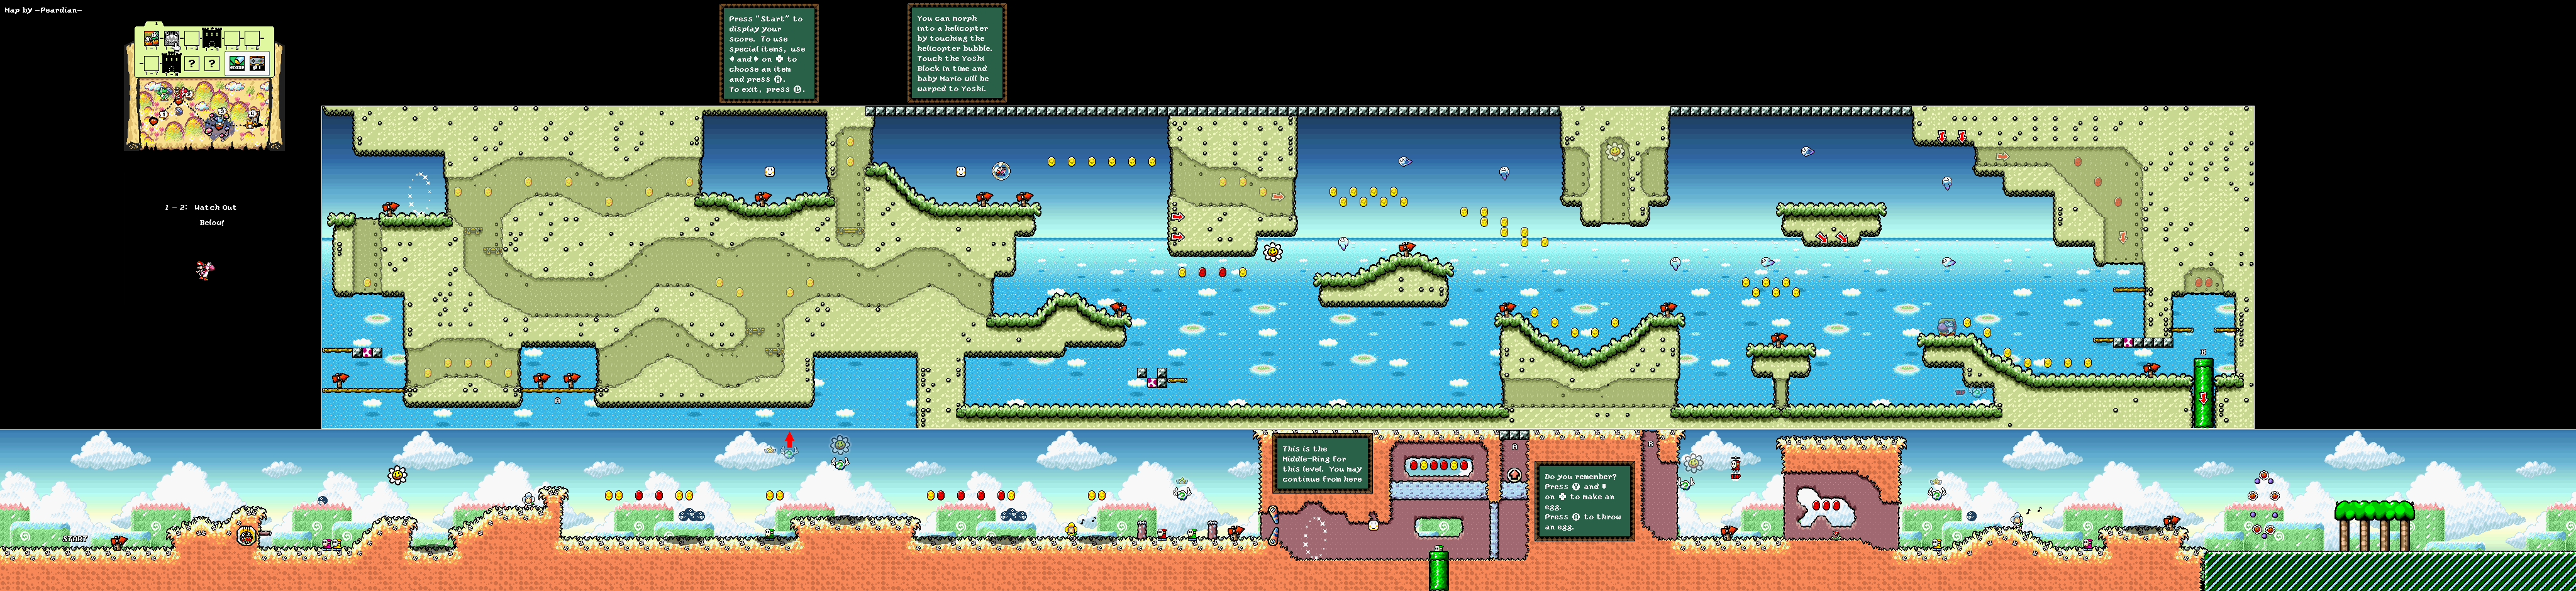
Move when the Incoming Chomps leap from the background, leaving room to land beyond the holes they create. Collect the first flower along the opening route and shoot the cloud holding the second. The opening section contains six red coins; another four are in the soft rock beyond the Middle Ring. Break that rock before using the Spring Ball to reach the helicopter bubble.
In helicopter form, enter the recess below the first large structure for a flower and two red coins. Search the middle opening for the next flower, then continue high to the right for three red coins. The pipe above the Yoshi Block leads to two more. Use another transformation attempt if necessary before committing to the exit.
The final area has a flower cloud near its entrance and three red coins around the Piranha Plant. Collect those before passing the Goal Ring. The complete red-coin grouping is 6 + 4 + 2 + 3 + 2 + 3; the first section alone does not contain ten.
Stage map: open to enlarge.
World 1-3 — The Cave Of Chomp Rock
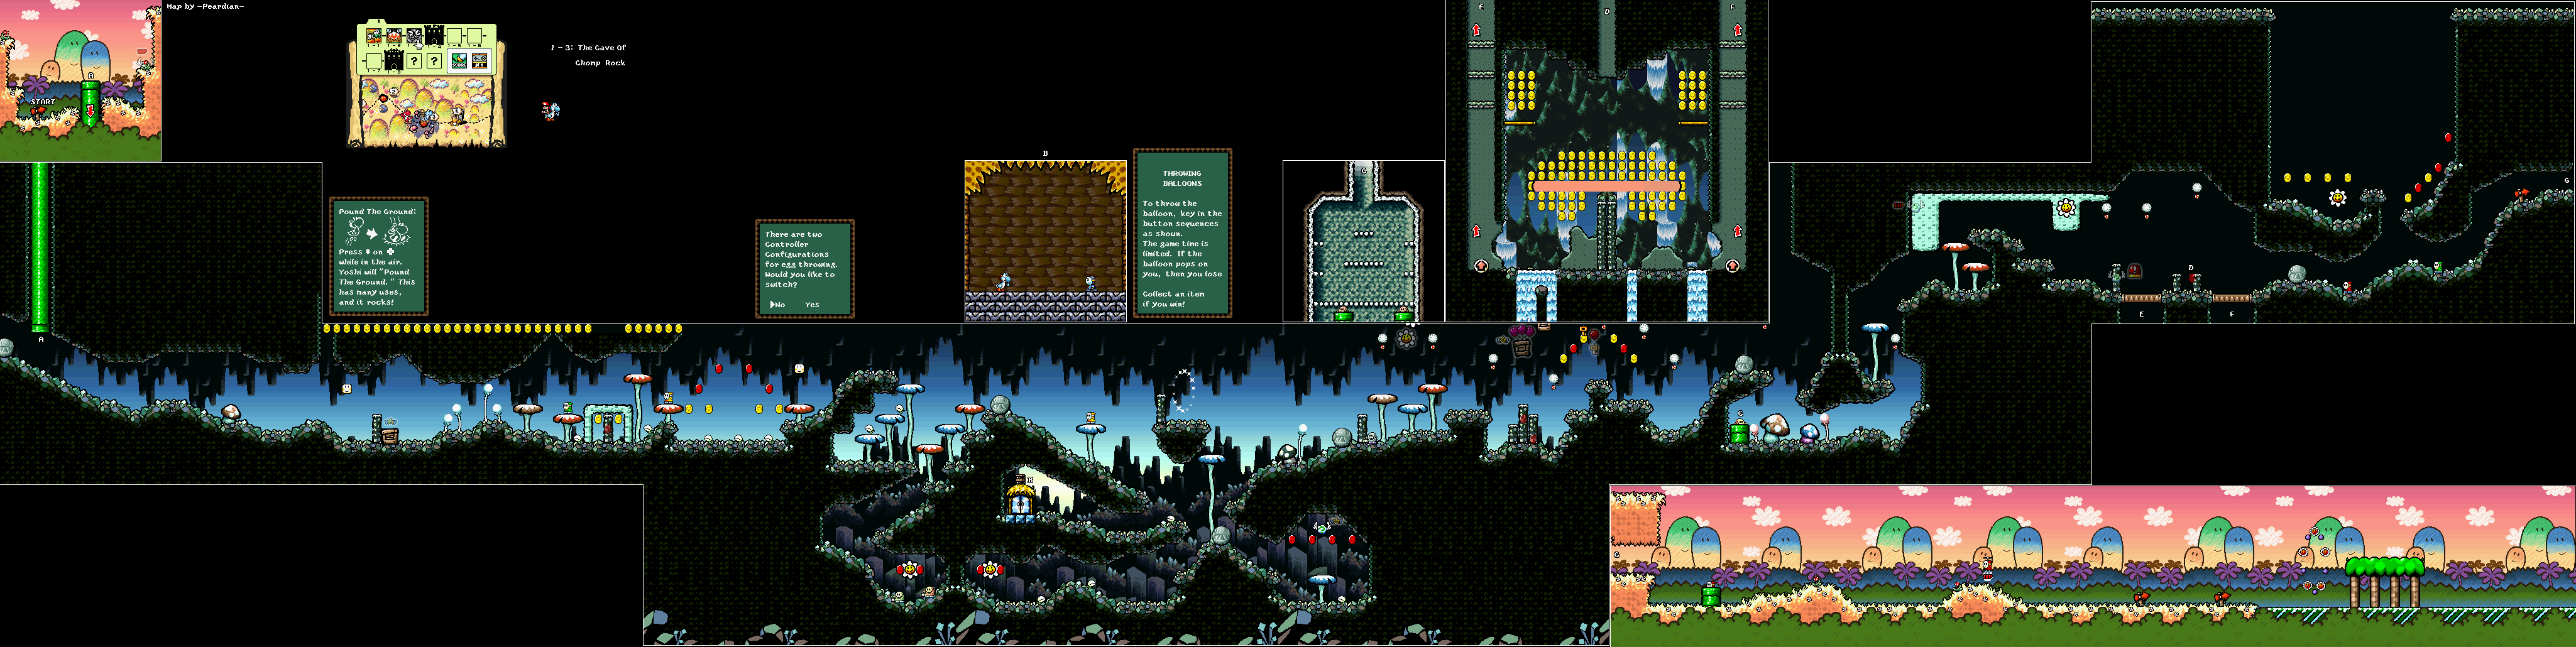
Ground-pound the wooden posts as you enter the cave; the second post hides a red coin. Before pushing the first Chomp Rock far ahead, explore the lower branches on both sides for the early flowers. Use eggs to clear soft walls without losing access to the ledges above them.
After the Middle Ring, climb above the mushroom platforms and Nippers for the next flower. In the group of three posts, pound the middle and right-hand posts fully into the ground for their red coins. Break the later soft-rock pocket for another flower before following the final Chomp Rock.
Keep the final Chomp Rock with you. Push it beneath the high ledge near the exit and jump from its top for the last flower and three red coins. A hidden switch between the posts also opens a coin bonus room. Check the map before leaving the cave: taking only the direct upper path misses the low branches.
Stage map: open to enlarge.
World 1-4 — Burt The Bashful’s Fort
Break the cracked ceiling blocks in the falling-wall section and climb onto the ceiling to sweep up its coin rows. Then return below for the first two flowers around the Burt enemies and drawbridge. Falling wall panels can crush Yoshi; let a panel settle before running across it.
Beyond the Middle Ring, shoot the bridge cloud and collect the coins overhead. On the seesaw above lava, lower the right end for one flower, then use the raised left end to jump to the other. A later locked door needs the key in the flowerpot farther along: push the pot from its ledge, collect the key and return. Inside, defeat all four Piranhas to reveal the last flower.
Burt the Bashful takes six egg hits to his body. His trousers slide down as he is hit; he does not shrink after every shot. Wait in either low recess while he jumps over you, then step out to throw. Refill from the Egg Plant when the arena is clear.
Stage map: open to enlarge.

World 1-5 — Hop! Hop! Donut Lifts
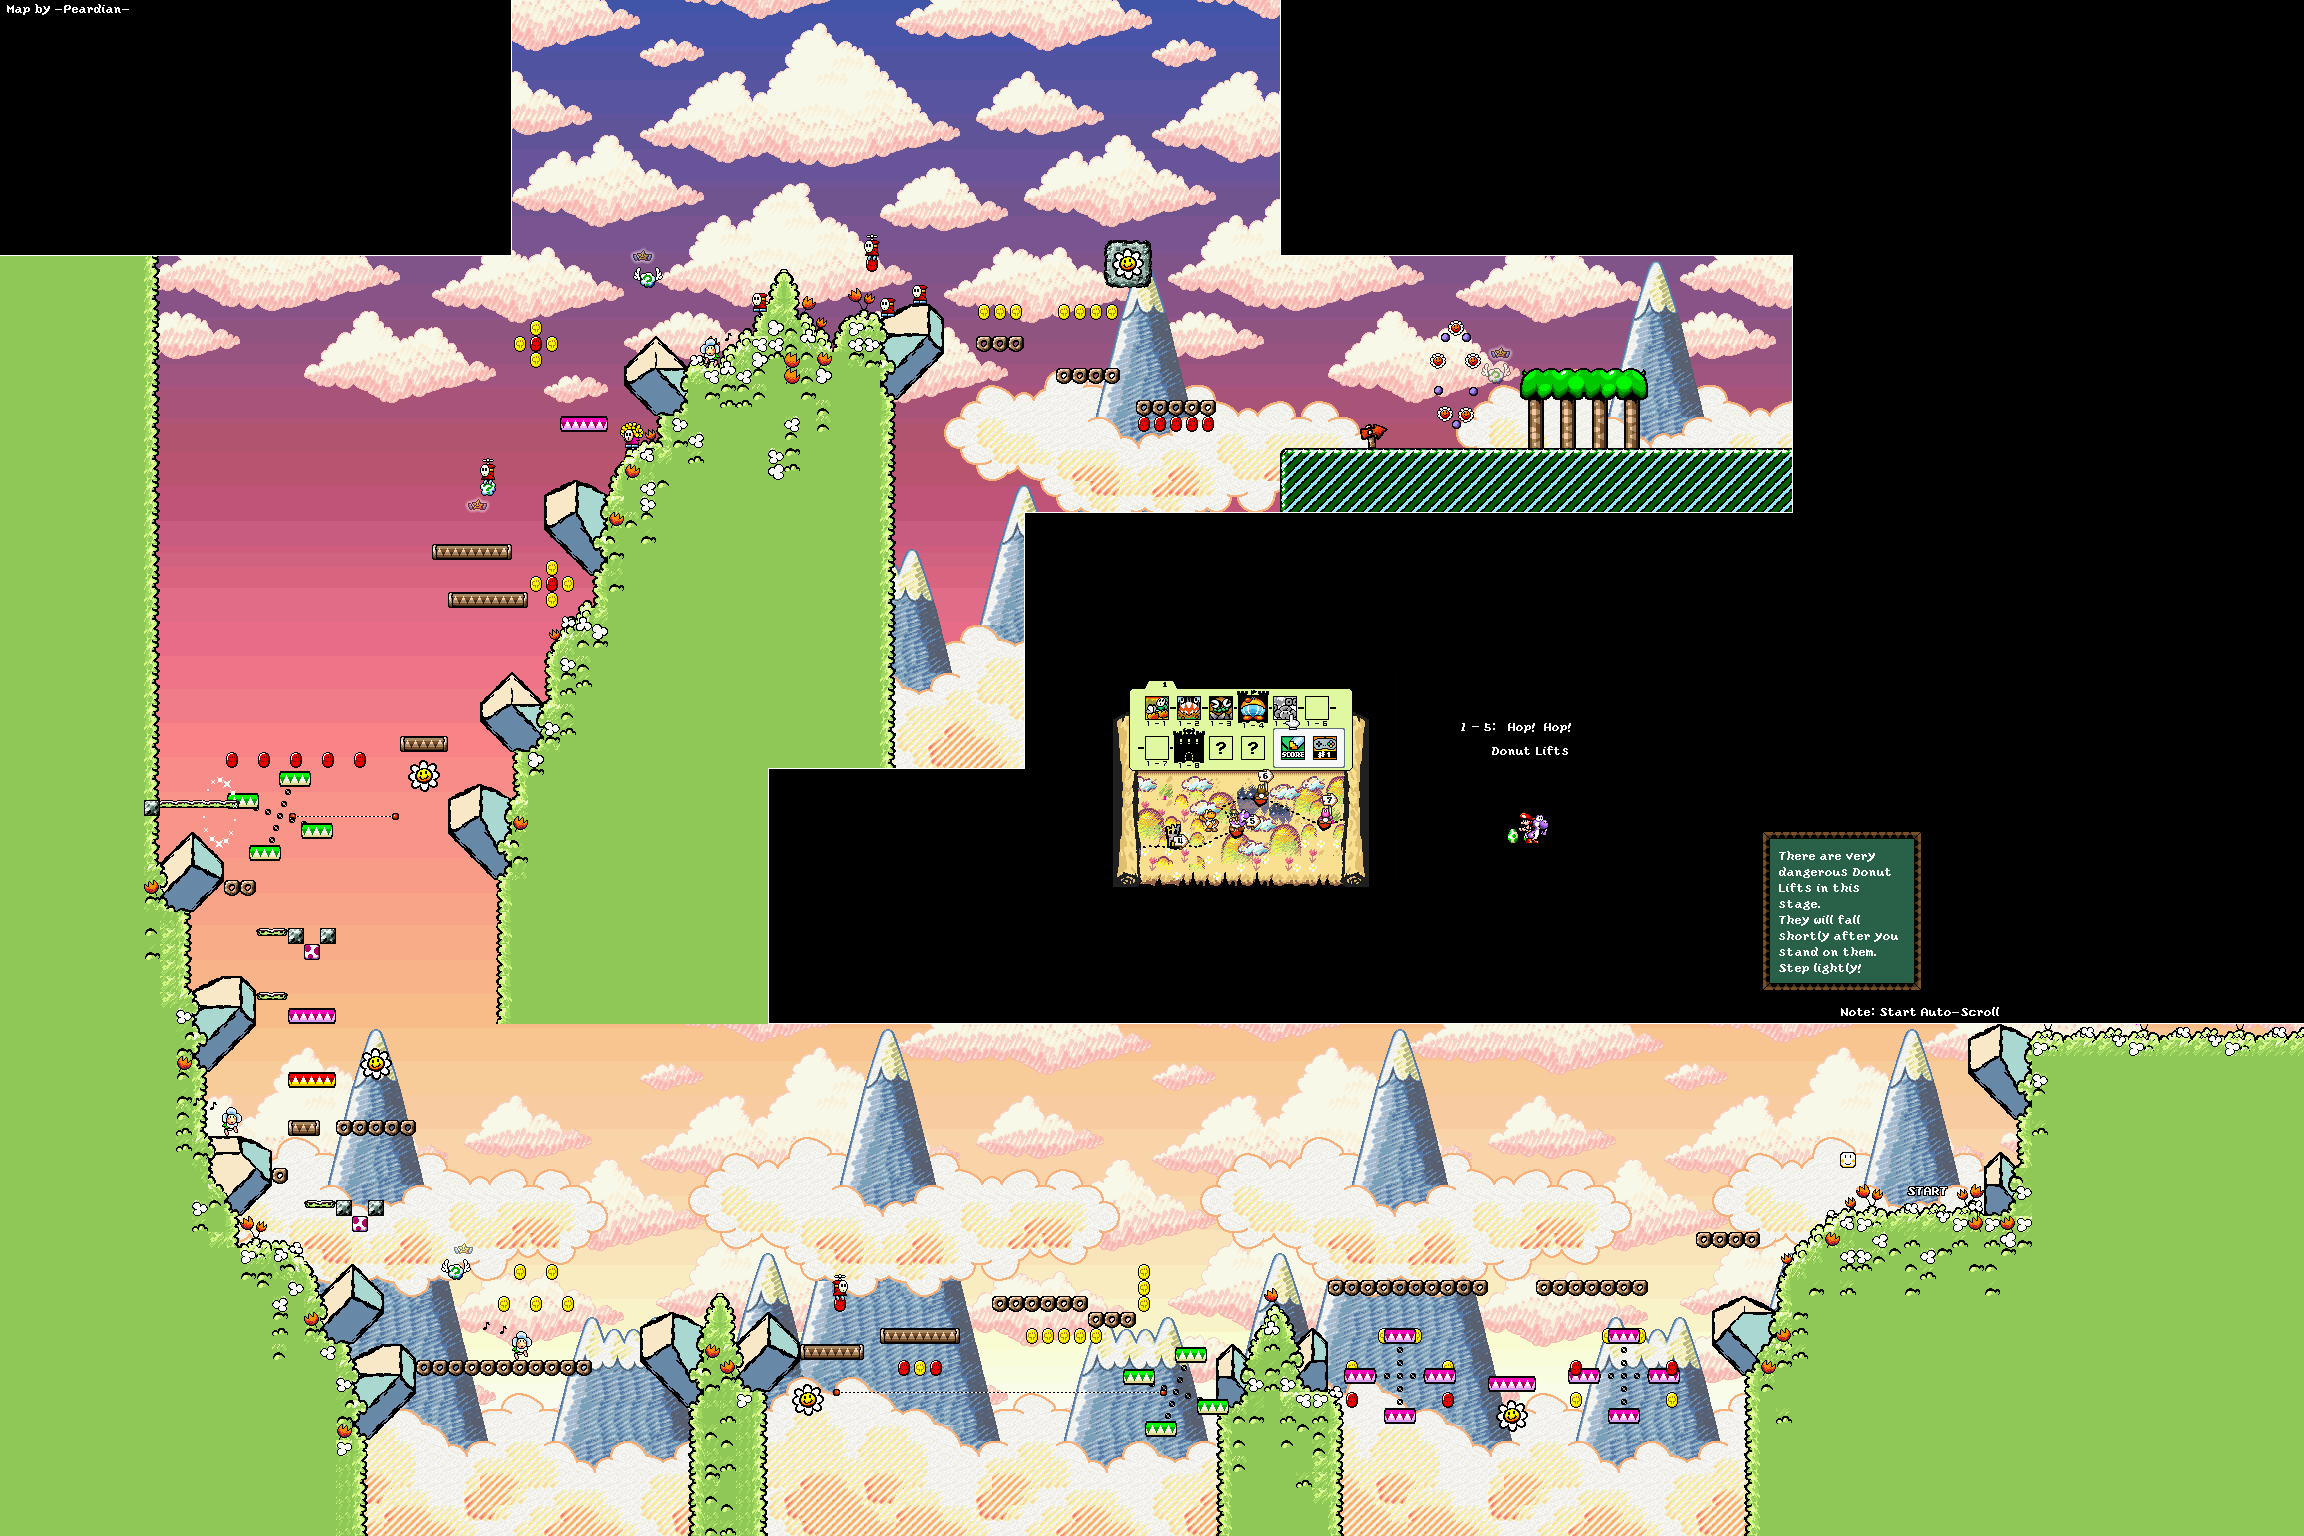
The screen scrolls automatically, so collect low items as soon as they enter reach. Ride the first ferries for the opening red coins and use the vertical lift for the first flower. On the paddle wheel, move around its rim to steer left for the second flower before continuing across the Donut Lifts.
Use the rising platform and Expansion Block to reach the high flower. After the Middle Ring, ride the next paddle wheel through its full useful arc; the flower and red coins are beyond the first convenient exit. Shoot the red-coin Fly Guys while they remain on screen.
Near the end, break the soft rock around the last flower. The final five red coins hang below Donut Lifts: stand long enough for a lift to fall, collect the low row and jump back toward safe ground before dropping out of the screen. A late jump cannot recover a coin already left behind by the camera.
Stage map: open to enlarge.
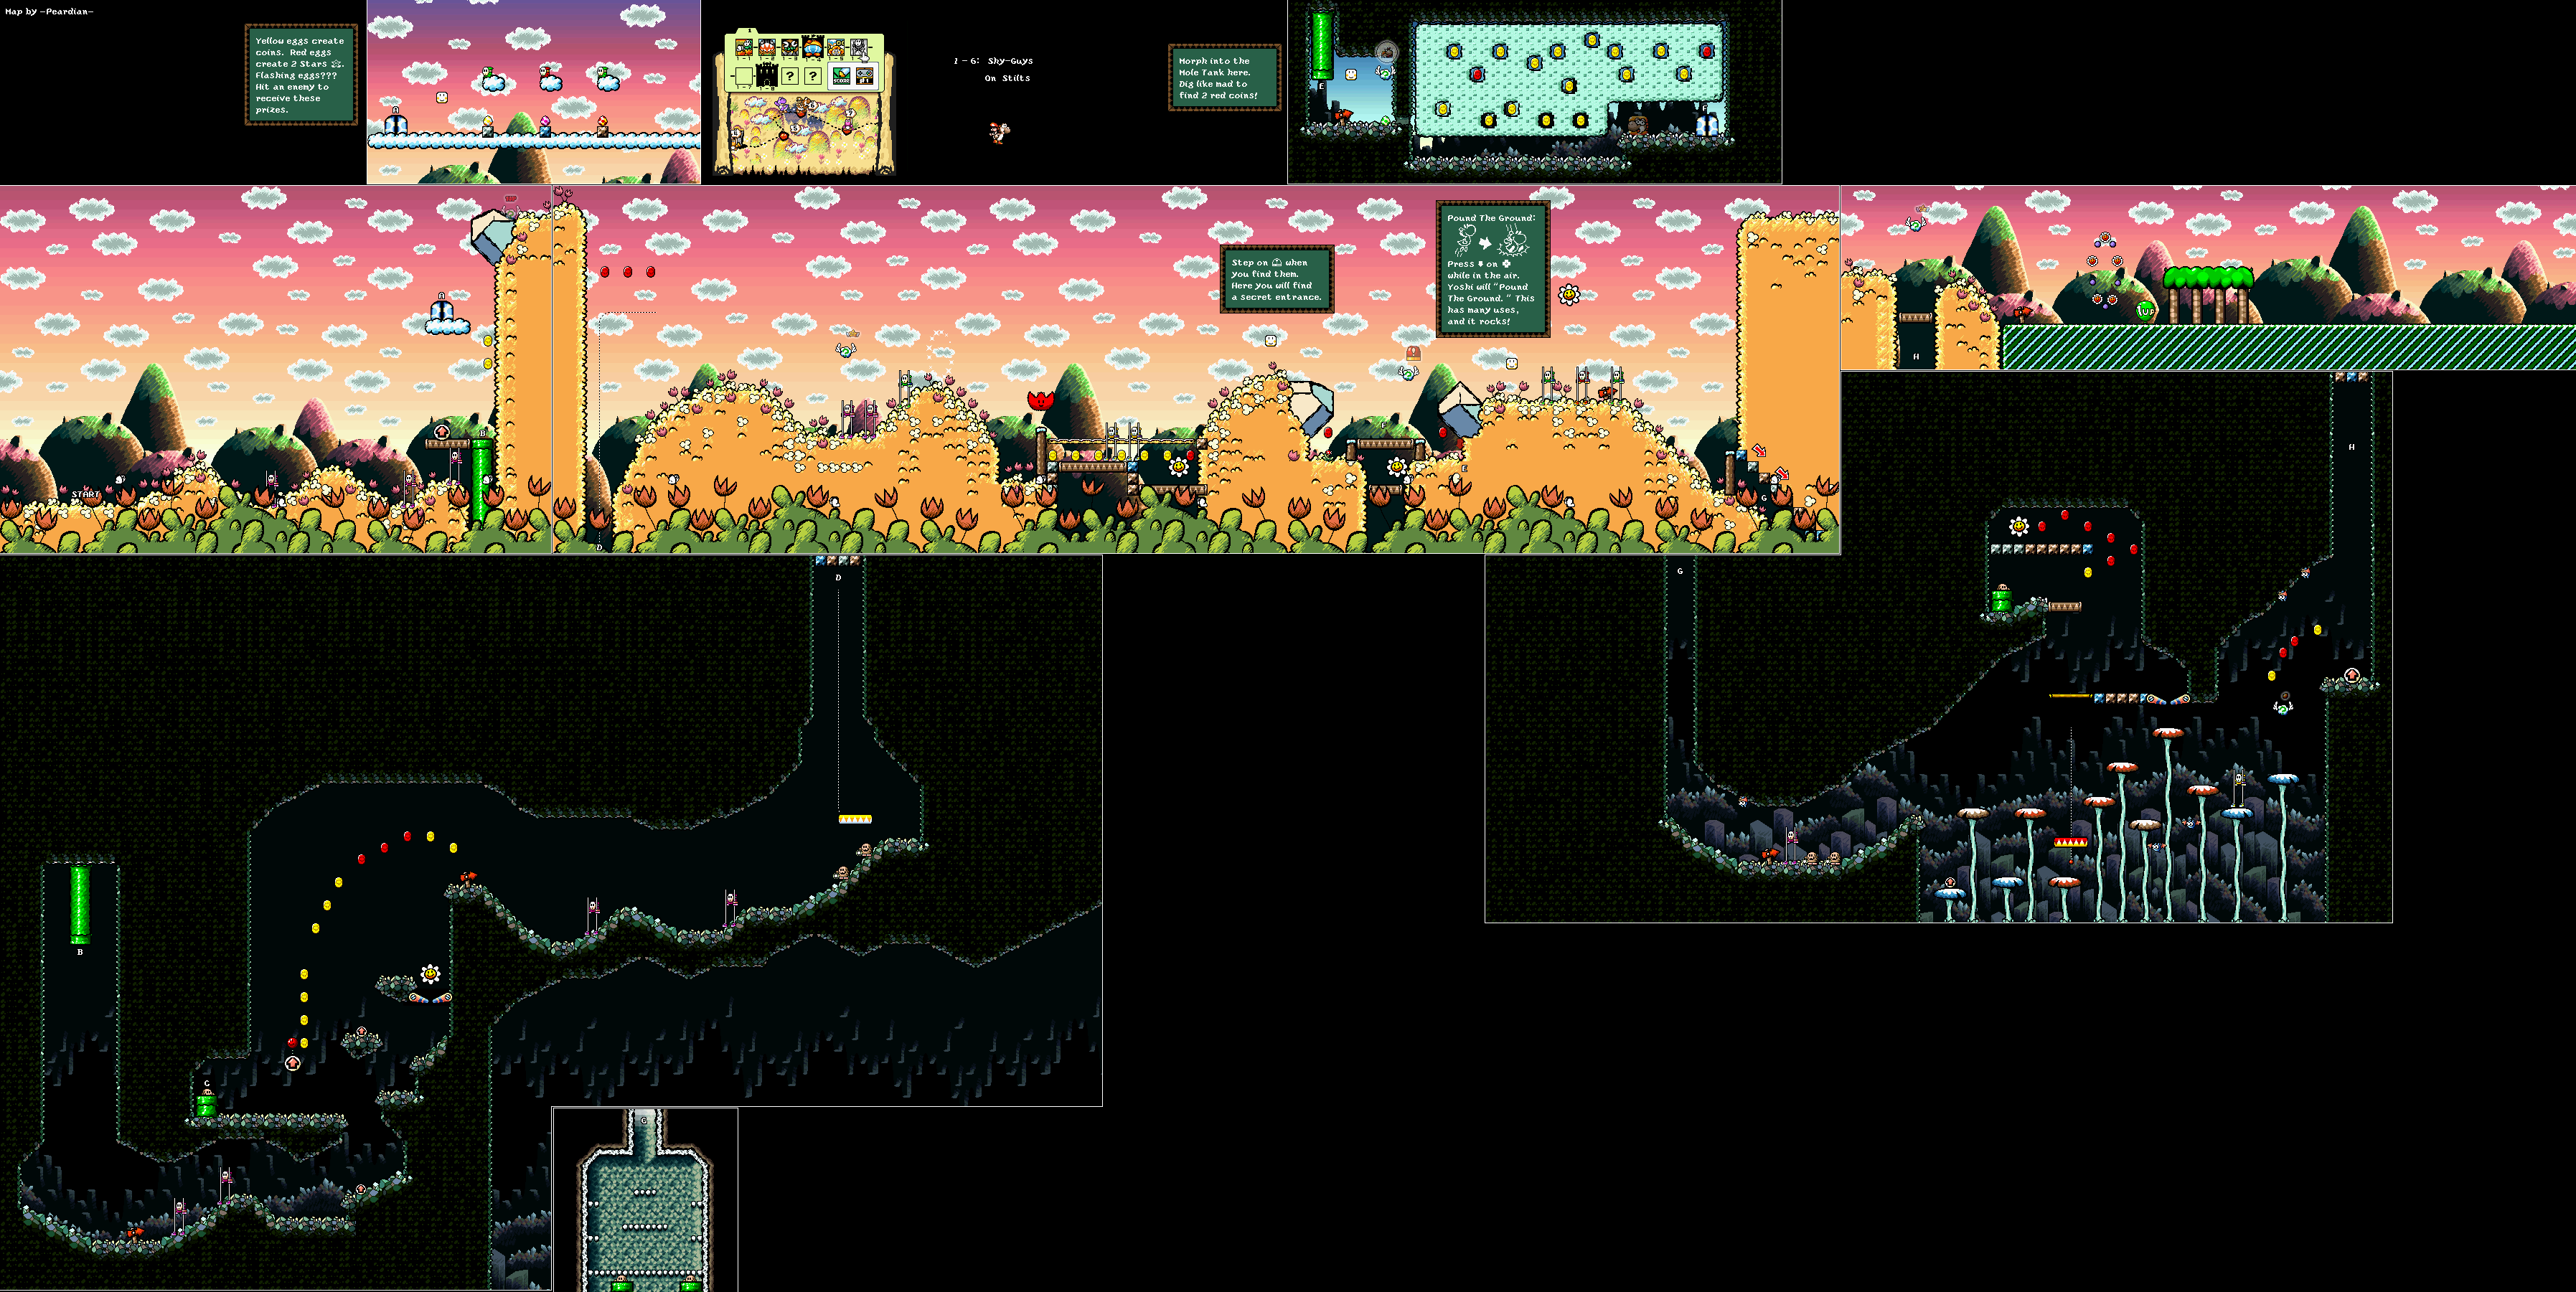
World 1-6 — Shy-Guys On Stilts
Knock the Shy-Guys off their stilts before swallowing them. Use the early Spring Ball to enter the side door containing a Flashing Egg. Throw that egg at an enemy to release its red coin; an ordinary red egg gives stars instead.
In the first cave, bounce upward through the balloon platforms for three red coins and the flower above them. Outside, search the ferry route before the Middle Ring. Pound the post beneath the tulip for the next flower, check the lower posts for another, then climb to the flower on the upper-right ledge.
Activate the later switch and take the Mole Tank transformation. Dig through the high soft-rock pockets for its two red coins before reaching the Yoshi Block. In the final cave, ride the red ferry upward and bank eggs into the upper collectible pocket. Hit the vine cloud before the exit and climb for the remaining red coins. Return to the goal only after sweeping both the lower posts and the high cave route.
Stage map: open to enlarge.
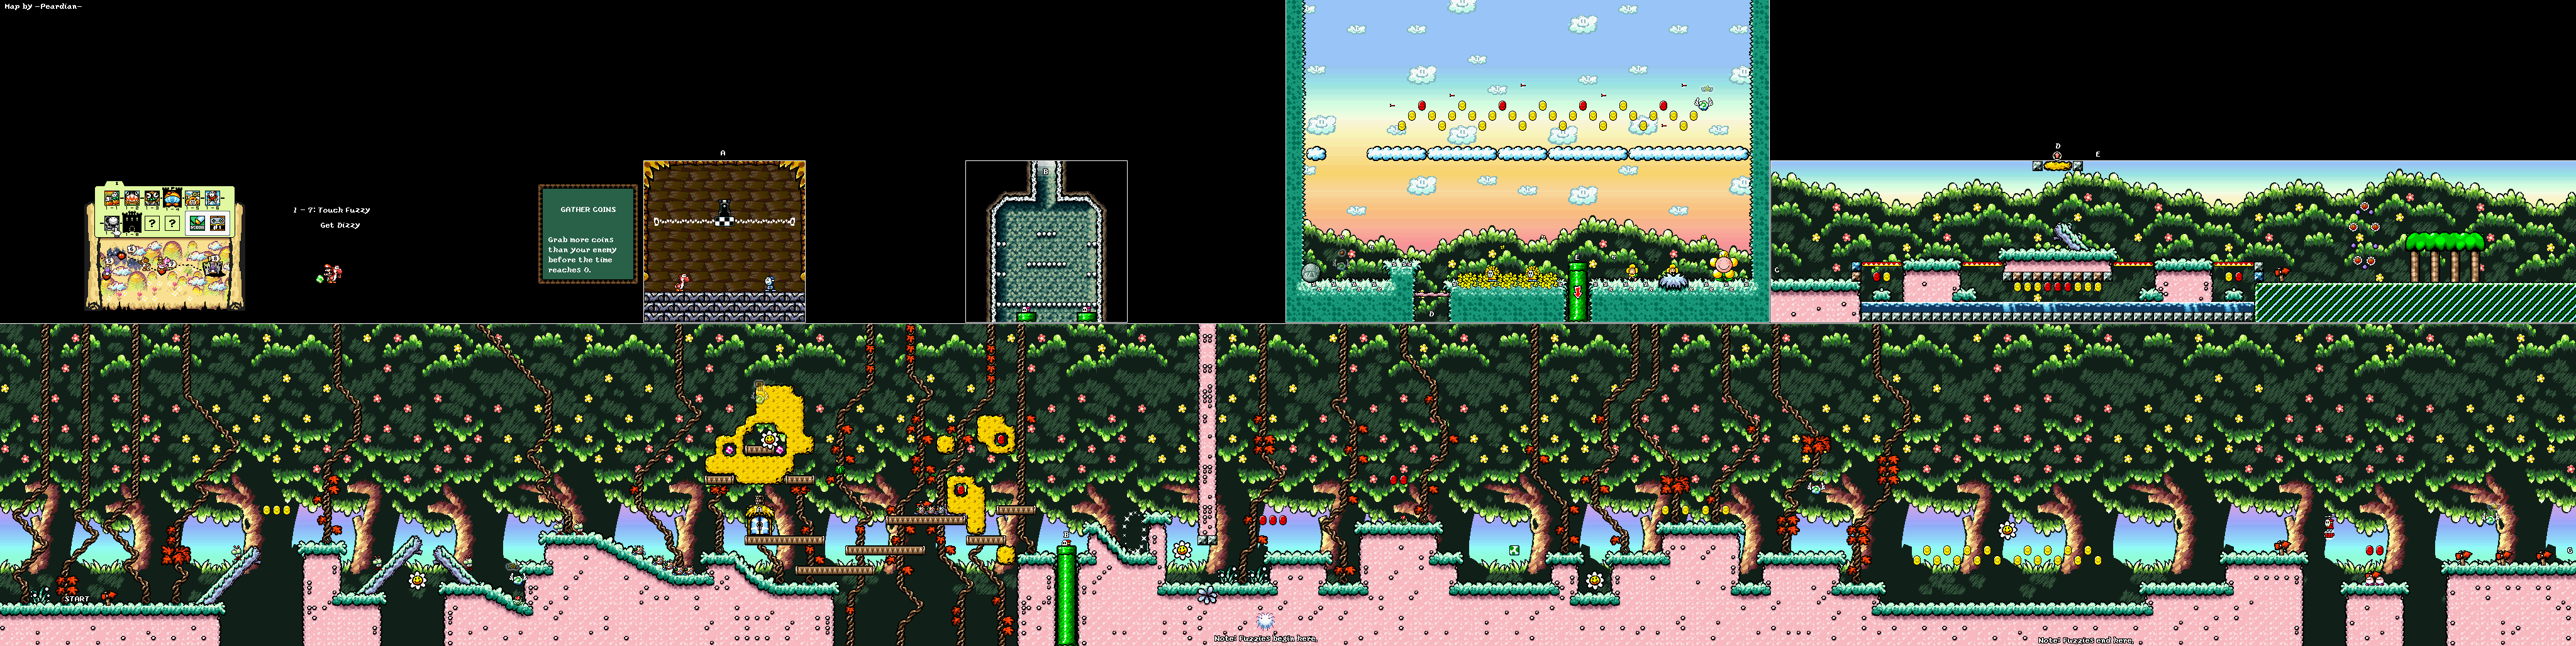
World 1-7 — Touch Fuzzy Get Dizzy
Spit the opening Melon Bug into the recess for the first flower. Above the mini-battle hut, break the soft rock and collect both Flashing Eggs. Hit enemies with them for two red coins, then clear the remaining rock for the other coins and flower in this section.
After the Middle Ring, pass the Fuzzies without touching them if possible: dizziness distorts the ground and makes the narrow jumps harder. Search the first flower ledge, clear the Piranha guarding the coin group and check the depression after the Egg Block for another flower. The Mildes farther along mark the next flower and red coins.
Near the goal, ground-pound the red-and-yellow bridge sections and collect the coins in the water. Stand on the high point of the sloping branch and jump straight up to release a Spring Ball. In its hidden area, go left to the Chomp Rock, stand on its right edge and roll it right. Shoot the cloud it reveals, then climb the vine for four red coins. Rolling the rock left misses this route.
Stage map: open to enlarge.
World 1-8 — Salvo The Slime’s Castle
Sweep the first room’s rotating platforms and high passages before leaving; this opening section holds thirteen red coins. Follow the narrow high route on the right and drop to the first flower. In the next section, use the rising water platform for the flower above it and enter the upper-left pipe for another. The upper-right pipe contains two red coins.
In the larger platform room, take the Middle Ring before searching the full circuit of the red ferries. Collect the five red coins along that route, the low-right flower beneath a Spring Ball and the flower high on the right. The key is in a flowerpot: push it off its ledge, then return to the locked route.
Salvo the Slime cannot hurt Yoshi by direct contact, but he can push you into lava. Keep room to retreat, shoot his body and swallow the Lemon Drops he sheds for more eggs. The Lemon Drops themselves can knock Baby Mario loose. Continue until Salvo disappears, preserving thirty stars through the fight for the score.
Stage map: open to enlarge.

Eight scores of one hundred give World 1 a total of eight hundred and unlock Extra 1 and the world’s Bonus game.