

World 1 covers courses 1-1 to 1-4 in the original NES version of Super Mario Bros. Open a map to enlarge it, or scroll it sideways to follow the main route and side rooms. These directions describe the first quest.
World 1-1 – The first steps

View map World 1-1 in original size
Move the map sideways to view the entire level and the side rooms.
Jump on the first Goomba and get the mushroom from the left question mark block of the next group of blocks. Follow the Super Mushroom to the right; the pipes stop it from rolling farther. Don’t cross the pipes until the area behind them is clear.
The fourth pipe from the start of the level leads into a coin room. You can get back outside via its right exit pipe far back. If you want to play the entire main path, stay up and jump behind the pipes into the seemingly empty area: there is a 1-up block hidden there.
There is a multi-coin block and a star on the middle block path. Retrieve tall question mark blocks from a safe brick platform. There are two pairs of stairs before the finish: the first has ground between the steps, and the second has a real pit. Take a run-up for this gap and land in a controlled manner on the opposite side. You reach the flag via the last staircase.
Tip: A Super Star protects you from enemies, but falling into a pit still costs a life. Therefore, even with invulnerability, don’t run blindly over the second gap in the stairs.
World 1-2 – Underground and first warp zone
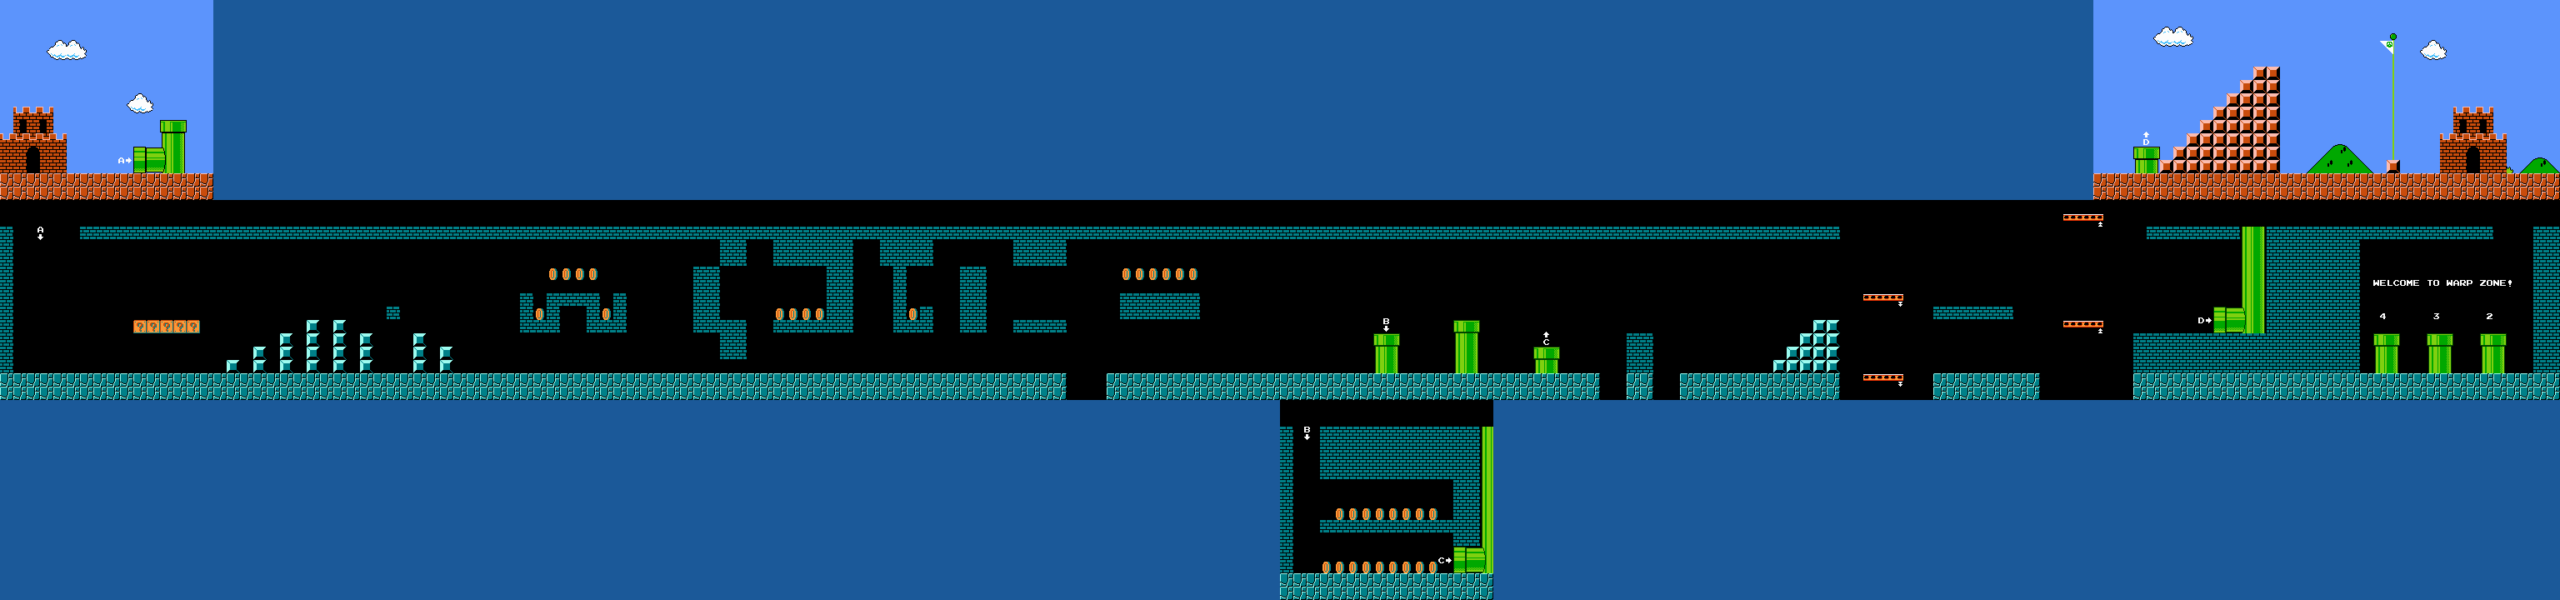
View map World 1-2 in original size
Move the map sideways to view the entire level and the side rooms.
Get the power-up from the first of the five question mark blocks. In the narrow block corridors you can hit Goombas from below while they walk above you. Kick a Koopa shell to clear a line of enemies, then follow it at a safe distance.
As big Mario, you can open the brick ceiling and run up. For the complete level path you stay at the bottom and cross the pits via the small intermediate islands. The first tube in the group of three leads to a coin room with an additional multi-coin block.
At the end, platforms move down to the left and up to the right. Jump onto the right platform early enough. The normal exit pipe leads to the flag and then to World 1-3. For the shortcut, let yourself be carried above the height of the tubes and run across the ceiling to the right: Behind the regular exit are the tubes to World 4, 3 and 2, from left to right.
Tip: Take the exit tube if you want to play through all 32 levels. A warp tube skips entire worlds.
World 1-3 – Above the treetops

View map World 1-3 in original size
Move the map sideways to view the entire level and the side rooms.
Jump from the safe starting floor onto the first high platforms. Watch the Goombas on the upper surfaces: they can fall right into your jumping path. Use the medium altitudes to briefly see the next landing site before each further jump.
Below a high platform lies the only question mark block with a power-up. Only take it with you if you then have a clear path back up. With Koopa Paratroopas, you wait for the bottom of their flight path and then jump over them or specifically onto their backs.
The two horizontal moving platforms in the rear area close the larger gaps. Get on when the platform comes to you and don’t jump until it moves to the next island. Use the last moving platform to reach the stone step before the Goal Pole. A safe landing is more important than the highest flag score.
Tip: Long press the jump button for high altitudes. Release early for short corrective jumps so you don’t overshoot small islands.
World 1-4 – The first castle

View map World 1-4 in original size
Move the map sideways to view the entire level and the side rooms.
Climb down the entrance stairs and observe the Fire Bar on the small island above the lava. The power-up hangs directly above it. Get it during a free spin period; Do not jump uncontrollably into the lava behind a mushroom that is running away.
In the following corridor, Fire Bars rotate from the ceiling. Keep running when the free window opens and stop between the turning circles. In larger rooms you also have to pay attention to bars on the floor. In front of the bridge, invisible blocks can shorten your flight path if you jump carelessly.
At the end there is a fake Bowser waiting. As Fire Mario, you can defeat him with five fireballs. Without Fire Flower, you wait for him to jump and run under him or use the platform above the bridge to go over him. Touch the ax on the right: the bridge collapses and the path to Toad becomes clear.
Tip: Bowser is not a compulsory fight here. The ax ends the encounter even if he is still standing on the bridge.