

World 3 covers courses 3-1 to 3-4 in the original NES version of Super Mario Bros. Open a map to enlarge it, or scroll it sideways to follow the main route and side rooms. These directions describe the first quest.
World 3-1 – Hammer Brothers at Night
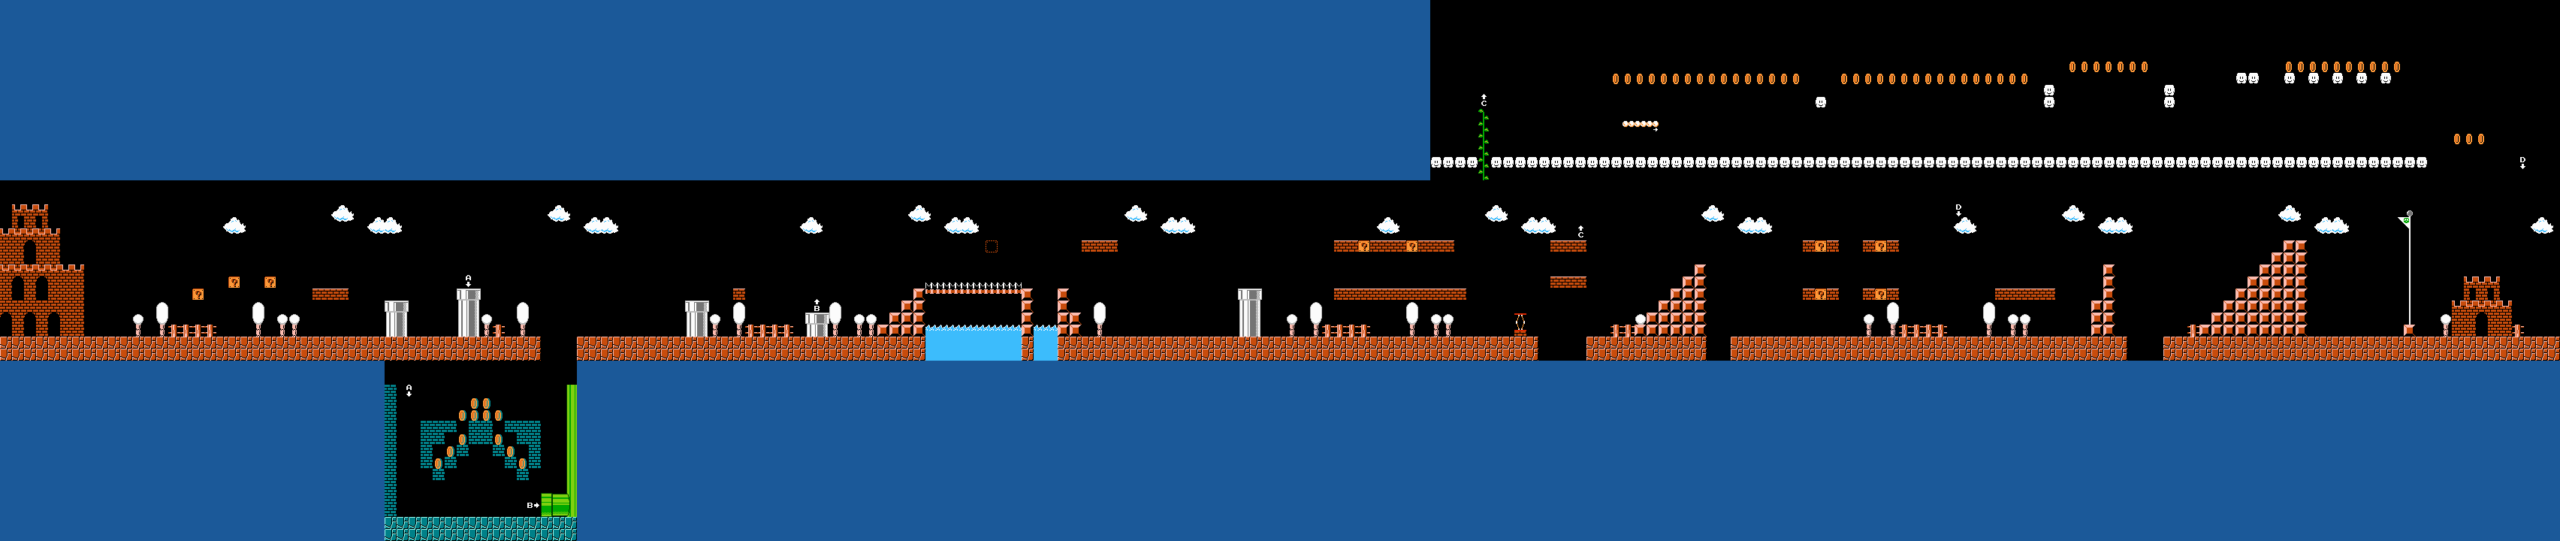
View map World 3-1 in original size
Move the map sideways to view the entire level and the side rooms.
The right power-up at the beginning helps against the jumping Koopa Paratroopas. The second tube leads to a coin room with another power-up. There is an invisible 1-up block above the subsequent bridge.
Get the star from the left tile of the following group of blocks if you want to overcome the Hammer Brothers safely. Without a star, you wait outside of their throwing range until both are in a more favorable position. As big Mario you can hit the block under a brother from below. Another power-up block lies in their platform group.
The springboard behind the brothers helps to the top row of bricks. In the right block a vine grows for a cloud bonus. On the ground the path leads over stairs, groups of enemies and other blocks. At the last climb up the stairs, Koopas run towards each other. Keep your distance from their shells or consciously use the well-known life trick there before jumping to the flag.
Tip: For the life trick, let a Koopa come to the lower steps and jump onto the shell so that it crashes into the next step. A mistimed jump can leave Mario in the shell’s path.
World 3-2 – enemy lines and shells

View map World 3-2 in original size
Move the map sideways to view the entire level and the side rooms.
Several Koopas and Goombas run towards you on the long ground path. A Koopa shell that is hit can hit a whole row. First jump on the Koopa, land next to the shell and then push it to the right. Follow him at a distance.
There is a question mark block with a power-up hanging above the first stone pillar. A little later there are two tiles on top of each other: the bottom one gives several coins, the top one gives you a star. The invulnerability is useful for the next collection of enemies, but does not eliminate the danger of the subsequent pit.
A Koopa Paratroopa and other Koopas are waiting beyond the gap. You should jump directly at the small intermediate platform with a stone pillar instead of forcing a single long jump. Behind the last large row of Koopas is a tube with Piranha Plant. This is followed by goombas and the target stairs.
Tip: A shell returns to you after colliding with a wall. Use it on open straights and jump over it in time when it comes back.
World 3-3 – Seesaw over the abyss

View map World 3-3 in original size
Move the map sideways to view the entire level and the side rooms.
Climb up over the first islands and watch out for a Goomba that can run down from the second platform. Two horizontal moving platforms close the next gap. The power-up later hangs over an island with Koopas.
The next narrow platform sinks as soon as you stand on it. Only use it briefly as a jumping station. Then there are two interconnected rocking platforms: your weight lowers the side you are walking on and raises the other. Don’t wait until the suspension is maxed out, because then both platforms will tear off.
Switch to the rising side in good time and use its height for the next jump. Behind three moving platforms follow more islands and a Koopa Paratroopa. A combination of moving platform and seesaw awaits you before you reach the finish line. Jump from there to the safe step in front of the flag.
Tip: Stand on a seesaw so that you have already lined up the next jump. Long readjustments cost height and can damage the suspension.
World 3-4 – Fire Bars in the narrow castle

View map World 3-4 in original size
Move the map sideways to view the entire level and the side rooms.
The entrance consists of small platforms with Fire Bars and lava vents in between. Only start jumping when both the staff and the rising fire bubble clear the jump path. There is hardly any space to brake on the tiny islands.
Of the three question mark blocks after this section, the middle one contains a power-up. Get it in front of the next Fire Bar section. The following three groups of bars require short, targeted jumps. A high continuous jump can hit you at the top of the ceiling even though the floor looks clear at the moment.
On the last path, Bowser flames come towards you. Cross the lava openings one at a time and also keep an eye on the fire bubbles. There is a brick barrier and a moving platform above the fake Bowser. Use the free route above or below him, or kill him from a distance as Fire Mario. The ax finishes the castle.
Tip: Don’t lose a life for a power-up: If the mushroom runs onto an inaccessible lava island, continuing safely is the better decision.