

World 4 covers courses 4-1 to 4-4 in the original NES version of Super Mario Bros. Open a map to enlarge it, or scroll it sideways to follow the main route and side rooms. These directions describe the first quest.
World 4-1 – Lakitus Spiny Eggs

View map World 4-1 in original size
Move the map sideways to view the entire level and the side rooms.
Jump over the first pipe and get the power-up from the question mark block below. Lakitu then appears and throws Spinies off. Move quickly to the right, but check pipes and pits before jumping. You are not allowed to land on Spinies.
You can jump onto Lakitu’s head from a high block or hit him as Fire Mario. Removing it creates breathing space, but does not permanently prevent a new Lakitu from appearing later. There is a 1-Up hidden above the second question mark block from the right in the row of four.
Behind the stone pillar is a group of tubes. The second of these tubes leads into a coin room with another power-up above the exit. On the main path, the third block from the left of the next row also contains a power-up. After the return point there are pits and a final stone pillar; climb to the finish stairs and the flag.
Tip: A consistent walking path is safer than panicking back and forth. Lakitu targets your movement while remaining Spinies block the ground.
World 4-2 – Underground with two warp zones
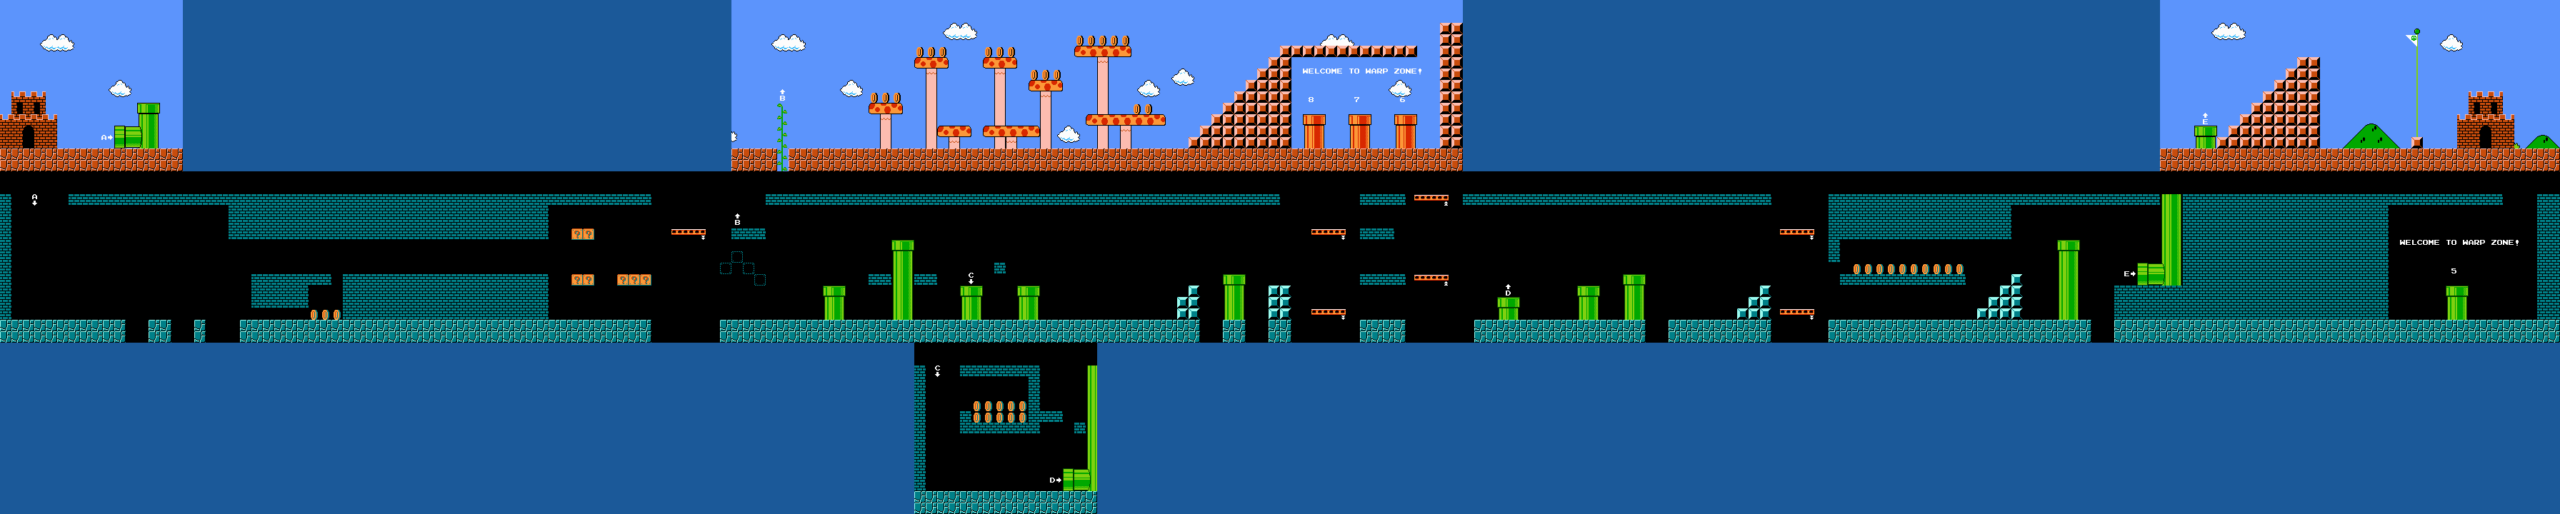
View map World 4-2 in original size
Move the map sideways to view the entire level and the side rooms.
Cross the large initial gaps with a running run over the narrow islands. Get the power-up at the end of the first group of bricks. Behind the Goombas there is a question mark formation with another power-up.
After the elevator goes down, there are invisible stepping blocks under a left tile in the upper row. Reveal the hidden blocks from below to build a staircase, taking care not to break the vine block as Super Mario. Hit it and climb to the upper bonus path: its warp zone offers worlds 6, 7 and 8.
For the normal route you stay in the tunnel. Koopas and Buzzy Beetle are waiting between the tubes; The third tube in the following group of four leads into a coin room. Cross the later platform lifts and use the regular exit pipe to reach World 4-3. If you instead walk above this exit pipe, you will find a second warp zone that only leads to World 5.
Tip: The route to World 8 is along the vine route, not just behind the normal exit pipe. Both shortcuts can be seen on the map as separate paths.
World 4-3 – Giant Mushrooms and Scales

View map World 4-3 in original size
Move the map sideways to view the entire level and the side rooms.
The tops of large mushrooms form your landing areas. Jump from mushroom to mushroom and watch Koopas on their edges. You can land on a Koopa Paratroopa, but its flight path is not a safe substitute for a solid platform.
There is a question mark block with a power-up hanging above the third particularly tall mushroom. Jump from the mushroom cap to hit the block, then secure your landing before collecting the power-up. Behind the first seesaw, two vertically moving platforms help. Wait on the fixed mushroom until the next lift is at the appropriate height.
In the last section there are three pairs of seesaws. Step onto the deep side briefly, switch to the rising platform and jump further before the suspension breaks. The last moving platform takes you to the final staircase. It’s better to go for a medium-high jump to the flag rather than a risky maximum score.
Tip: A fireball can knock out a Koopa on the next mushroom cap before you jump over yourself.
World 4-4 – Castle Labyrinth: up, then down

View map World 4-4 in original size
Move the map sideways to view the entire level and the side rooms.
From the entrance stairs, go across the lava to the first branching corridor. In order for the castle to continue running, you have to cross the right height. At the first junction you take the upper path. The lower route respawns the same section.
In the following room, jump over the platforms to the second labyrinth. There are three heights here; the correct route is at the bottom. Stay on the lower path until the end of this area instead of switching to the middle in between. The short solution is: first at the top, then at the bottom.
On the last section, fireballs come towards you. There is also a rotating Fire Bar on the boss bridge, and a fire bubble rises from the lava. Wait for a free window. Defeat the fake Bowser with fireballs or overcome him without getting into the bridge pole and touch the axe.
Tip: The original NES version lacks the helpful confirmation tone of later reissues. If a room repeats itself, correct your route instead of simply continuing to walk at the same height for longer.