
Here you are at the complete walkthrough of the game ‘Donkey Kong Bananza‘ for the Nintendo Switch 2 in the Hilltop Layer.
Explore with us the different layers under the earth. In the Hilltop Layer SL200 you will find a total of 38 Banandium sites and 30 Ammonite fossils. Our complete solution shows you all the locations, challenges and hidden spaces.
With the checklist you can tick off each Fund directly. Your progress is automatically stored in the browser.
SL200: Hilltop Layer – all 38 Banandium Gems
Note: The Banandium Gems 3 to 5 at Hill-Growtone are only available after the main story is completed.
1. Bruised Peekabruiser!
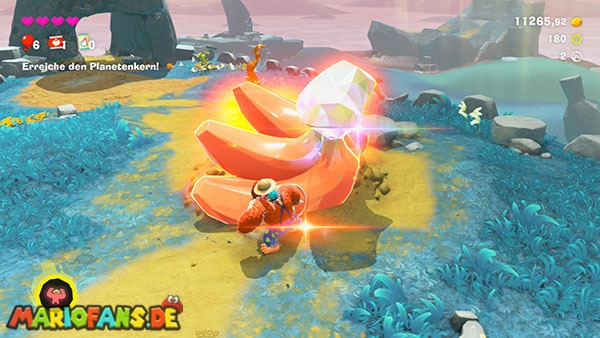
After defeating Peekabruiser in the Lagoon Layer and landing in the Hilltop Layer, the first Banandium Gems are right in front of you. You cannot miss this find. The reward consists of five Banandium Gems, but is listed in the area list as a place of discovery.
2. Cave-Dwelling Treasure
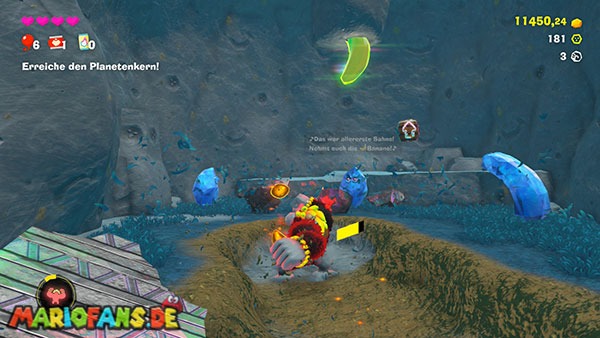
From the location of the first Banandium Gems you dig down. Follow the blue fractone moving through the terrain. Always strike and dig in his direction until you reach an underground cave. Behind the last walls is the Banandium Gem.
3. The Hilltop Growtone
This jewel is available only after the main story is completed. After that, return to the Hilltop Layer and find the big Growtone on the muddy platform at the Fractone Village.
Feed him with gold. Once you have invested a total of 600 gold, the first branch grows and the banandium gem appears.
4. The Hungry Hilltop Growtone
Keep feeding the same growtone. If the total amount of gold fed reaches 3,000 gold, another branch grows and you get the second Banandium Gem.
5. The Sated Hilltop Growtone
For the last jewel, you have to completely saturate the hill growtone. Keep feeding it until you have invested a total of 6,000 gold. After that, his last branch grows and the third Banandium Gem appears.
6. Battle: Dig, Dig, Dig on Down
In the Fractone village, to the right of the Teleport Gong, you will find access to a combat challenge. Enter the shaft and work your way down.
With the Kong Bananza you can break through the floors particularly quickly. There is a crockoid at the bottom. Defeat him within the time limit and you get the Banandium Gem.
7. The Shifty Path under the Village
Go behind the chip changer in the fractone village. Below the village are several Schwindium blocks or floating cubes.
Throw boulders or other material against the blocks to create a path. Follow him to the stone wall and destroy it. Behind it is the Banandium Gem.
8. A Shifty Path Forward
Between the clothes shop and chip changer, on a floating platform is the entrance to the challenge with the Schwindium platforms.
Enter the course and cross the first section with the emerging and disappearing platforms. The first jewel is on the normal path and is hard to miss.
9. An Out-of-the-Way Room
Stay in the same schwindium challenge. In the section with spikes or brighter terrain, on the left is a platform that moves vertically.
Use it and stay on the left. Destroy the thorn wall there. Behind her is a hidden adjoining room with the Banandium Gem.
10. Make-Your-Own Platforms
Complete the Schwindium Platform Challenge. Throw material onto the planned thinning surfaces to create new platforms and cross the thorn fields.
At the end of the course awaits the third Banandium Gem.
11. Hilltop Fragmentone Recovery
Go to the Teleport Gong in the Fractone village and jump down from the cliff. At the foot of the rock face is a cave with a lot of gold.
Destroy the golden or stone wall and talk to Fractones. First, find and free one of its three missing fragments and bring it back. For this you get the first jewel.
12. Hilltop Fragmentone Restoration
Search in the same cave also the two remaining fragments. Carefully destroy the terrain and bring all the pieces safely back to Fractones.
When all three fragments are reunited, you get the second Banandium Gem.
13. Battle: Spike-Spout Scrap
Leave the Fractone village towards the construction site. To the right of the main path is under a banana-shaped rock arch the entrance to a combat challenge.
Defeat three crockoids. Watch for the barbed bullets and use the Kong Bananza if necessary to quickly knock out opponents. After the fight, you get the jewel.
14. Hilltop Hide-and-Seek
To the left of the path from the Fractone village to the construction site you will find a large stone and concrete construction with several banana-shaped sculptures. Talk to the search tone there.
You need to find four hidden fractons:
- One is right near the search sound in the rock.
- The second is in the rock face behind him.
- Another is on the back in the hard concrete – the Kong Bananza helps here.
- The last one is hidden at the foot of the largest banana sculpture.
Use the hand clap to more easily track down the hidden fractons. Once you have found all four, you will get the Banandium Gem.
15. Hilltop Smashin‘ Stats
Near the construction site or the access to the canal shaft you will find Smashintone.
For his task, you have to destroy a total of 20,000 m3 of stone in the Hilltop Layer. Progress also counts if you simply disassemble large rock formations with Kong Bananza.
Once you have reached the required amount, talk to Smashintone again. As a reward, you will receive the jewel.
16. Bloomed in the Hilltop Layer
Near the construction site you will find a Bloomintone, which is lighted by a large stone banana.
Completely destroy the rock formation above or next to it so that light falls on the plant again. As soon as Bloomintone blossoms, the Banandium Gem appears.
17. Thorny-Hill Finish Line
Below the construction site, in the rock face is the entrance to the Challenge thorn-covered hill.
Take the opponent’s metal chunk at the start and use it for terrain surfing. Race over the track, avoid the thorns and reach the finish line. For the normal degree you get the first jewel.
18. Thorny-Hill Buzzer Beater
Complete the same thorn hill challenge again – this time especially quickly.
You have to reach the goal with at least 20 seconds remaining time. Take the opponent’s chunk right at the beginning, constantly accelerate and cut the corners as tightly as possible. Then you get the second jewel.
19. Thorny-Hill Hideaway
At the end of the Thorn Mound Challenge, you don’t go back immediately.
Pick up a chunk and make a chunk jump over the high wall behind the target. On the other side is a hidden area with the third jewel.
20. Shifty Smash: Break the Canopy
At the foot of the bowl tip or under the mountain, behind the muddy bananas is a cave with a Shifty Smash challenge.
Activate the triangle and destroy the marked targets or Schwindium elements within the time limit. Pay attention to the protective structure and clear a free path first. After successful completion, the jewel appears.
21. Battle: Three-Tiered Tussle
Approximately halfway up the shell tip is the access to a combat challenge.
Here, three crockoids are waiting at different altitudes. Use a chunk jump to get up between levels and defeat all three opponents within time.
22. Peeled from Peel Peak
This banandium gem belongs to the normal progression at the tip of the shell.
Work your way to the summit and remove the void terrain. Once the contamination has been removed, you will receive the jewel or expose it.
23. The Skies over Peel Peak
Look at the top of the sky. Above the large stone banana formation hovers a platform.
Throw a boulder or stone against the bottom of the platform. This lowers it and you can collect the Banandium Gem on top of it.
24. Bananas All the Way Down
At the top of the bowl are three huge stone bananas next to each other.
Examine the middle banana. At its end is hard concrete. Destroy it – easiest with the Kong Bananza – and you will find in it the Banandium Gem.
25. Shifty Smash: The Rotating Ring
In addition to the large muddy or stone bananas of the shell tip, there is another banana-shaped passageway.
Enter the cave and start the Shifty Smash challenge with the rotating ring. Destroy all given goals within time. Then you get the jewel.
26. Against the Oncoming Tide
Enter the challenge inside the left large stone banana at the top of the bowl.
On the track, spine balls are constantly rolling towards you. Take the boulders and throw them in front of the bullets to create craters. The spiked balls fall in and the path becomes clear.
The first jewel lies on the normal path through the challenge.
27. Against the Winding Tide
Continue the Spike Ball challenge. Continue to use the boulders to divert the dangerous bullets or drop them into craters.
Reach the regular end of the course and you will receive the second Banandium Gem.
28. Amidst the Hidden Tide
Shortly before the end of the same challenge, a bridge leads to the goal. Look under the bridge and drop to the hidden level.
There, pull the beets or chunks out of the ground. You get two boobys:
- With the first one, you clear the spine balls out of the way.
- With the second you destroy the concrete on the Blanket.
Then climb up the exposed wall and hang along the grid. On the other hand, the third jewel is waiting.
29. The Flying Banana
In the vicinity of the tip of the shell, a machine flies around, which drops spiked balls. At the same time, a Banandium Gem hangs on the construction.
Observe their flight route and stand below their lowest point. As soon as the machine sinks far enough, jump up and smash the jewel.
30. Gold-Dipped Banana
To the right of the Fractone village is a large round concrete surface, on which spine balls constantly roll.
Use the handclap several times around the circle. This creates walls that keep the spiked balls away from the center point.
If the area is clear, turn into the Kong Bananza and destroy the concrete floor. Underneath the plate lies a gold-filled cave with the Banandium Gem.
31. Hilltop Quiz Master
On one of the large stone bananas to the right of the Fractone village you will find Quiztone. Answer all three questions correctly.
The correct answers are:
- Question 1: Fossils
- Question 2: Your helmet
- Question 3: As a projectile / launchable explosive device
After three correct answers you get the Banandium Gem.
32. Cranky’s Hilltop Rant
Stay at the great stone banana near Quiztone and look up at the sky. Cranky Kong is on a floating platform.
Throw a chunk against the bottom of the platform. This lowers it. Then talk to Cranky and listen to his complete tirade. Then you get the jewel.
33. Shifty Smash: Downhill Run
Near the starting hill or the teleport gong you will find another Shifty Smash challenge in a banana-shaped rock arch below.
Activate the triangle and follow the preset targets down the slope. Destroy all within the time limit and the Banandium Gem appears.
34. Tunneling through the Pit
Go to the big construction site with the deep shaft. Let yourself down into the shaft or climb along the wall.
Approximately halfway up is a rock outcrop with a concrete wall. Destroy the concrete with the Kong Bananza. Behind it lies the Banandium Gem in a hidden niche.
35. Treasured Memories
Enter the challenge nostalgia land near the canal shaft.
Immediately after the start, you do not go forward. Take a chunk and use a chunk jump to get back up the wall at the entrance.
Above you will find DK’s classic tree house. Jump on the tires in front of the house and get catapulted up to the Banandium Gem.
36. Over the Valley
Play nostalgia-land afterwards on the normal way.
About halfway through the classic jungle course, the second Banandium Gem is right on your way. Just follow the platforms across the valley.
37. Hijinxs in the Jungle
Master Nostalgia Land completely. Cross the entire classic jungle course with barrels, platforms and obstacles.
At the end of the course awaits the third Banandium Gem.
38. Hilltop Chip Exchange
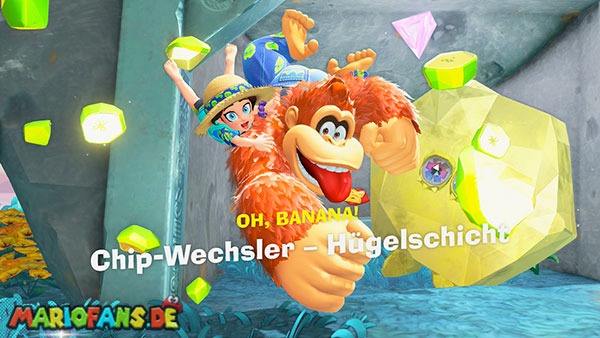
Visit the chip changer in the Fractone village and exchange banandium chips for a banandium Gem.
For the 100% list of the Hilltop Layer you have to buy at least one jewel here.
The price is not the same for every player: the first chip change in the entire game costs 10 chips, after which the price increases with each purchase by another 10 chips. This progress applies across all layers.
All 30 fossils in the Hilltop Layer
There are only 30 Ammonite fossils in the Hilltop Layer. There is no rare or extra rare fossil here.
Use the handclap regularly. Their sonar shows you fossils even if they are hidden in rocks, mud or platforms.
Go to the Fractone village and find the huge stone banana that juts out over the edge of the island. The fossil is located just below the top of this large banana.
Go to the construction site with the big sinkhole. Run to the back of the shaft. There, the fossil lies behind the sinking hole or on the backward rock edge.
Start at the fast travel point at the Thorn Hill and follow the path towards the stone banana tunnel.
Just before entering the tunnel, turn right. On the outcrop on the edge you will find the fossil.
From the fast travel point at the Thorn Hill, you go to the right side of the platform and carefully drop onto the lower cliff.
There the fossil lies open on the rock outcrop.
Turn around at the high-speed thorn hill and go to the opposite cliff edge. Let yourself fall to the lower level.
The fossil lies on the cliff below the fast travel point.
In the Fractone village, a large stone banana juts out over the edge of the island.
The fossil is located on the neck or narrow neck of this banana formation. Climb along the rock structure and set it free.
Go to the fast travel point thorn-covered hill. The fossil is located directly in the lower part of the rock formation on which the fast travel point is located.
Run around the base once and use the hand cloth if you don’t see it right away.
In the Fractone village there is a larger muddy platform. Go to their bottom.
The fossil is located or close to the foot of this platform.
In the Fractone village, go to the area between Chip-changer and Stuff Shop.
On the cliff wall between the two shops is the fossil. Just knock it out of the rock.
Across the fractone village, near the large stone banana, a worried fractone walks around a platform.
The fossil is located inside this platform. Use the hand clap and dig or hit the terrain.
Stick to the same platform with the concerned fractone.
Inside, a total of three fossils are hidden. Continue digging the platform and use the handclap until you find the second Ammonite.
The third fossil is also in the platform of the concerned fracton near the large stone banana.
Destroy the remaining material around the sonar mark and collect the last ammonite of this group of three.
Go from the fast travel point thorn hills towards the nearby hills.
At one of the rock formations, a small single stone sticks out. The fossil is right in that lead.
Near the Fractone village, a smaller stone banana juts out from the ground.
Climb to the formation. The fossil is clearly visible on the stone banana.
Between the Fractone village and the construction site is a particularly large stone banana.
Climb to the top of this formation. There you will find the Ammonite.
Stay at the same large stone banana between village and construction site.
The next fossil is on the narrow neck or neck of the banana. Let yourself drop something down from above and knock it out of the rock.
Go to the construction site. On one of the cliff walls near a flowerbed is the ammonite in the rock.
Use the hand cloth on the edge of the site to locate it more easily.
At the construction site is the entrance to a challenge.
Climb to the rock formation above the challenge entrance. That’s where the fossil is.
In the vicinity of the thorn hill or the large stone banana you will find a worried fractone running around on a flower bed.
Tomb exactly in the middle of the marked place down. There is a treasure chest with the fossil.
In the large free surface around the shell tip there are several movable or rotating pillars.
On one of these rotating pillars lies the ammonite. Wait until you can reach him well, and jump over.
At the foot of the bowl tip is a striking muddy hill with gold at the top.
Grab yourself from above. The hill is hollow inside and contains a total of three fossils. The first is inside.
Stay in the hollow sludge mound at the foot of the top of the shell.
Use the hand clap and continue digging the inside. There is the second ammonite of the same group of three.
The third ammonite is also located inside the gold-crowned mud mound.
Destroy the remaining muddy material until you find the last fossil of this group.
At the tip of the shell are three particularly large stone bananas.
Climb to the top of the third banana. At the top, the ammonite is open on the rock.
Stick to the same third stone banana.
Now destroy the banana formation and work your way inside it. There are three other fossils in it. The first ammonite is inside the banana.
Destroy the third stone banana. Use the handclap to mark the fossils in the rock.
The second fossil of the group of three is located a little deeper inside.
The third ammonite is also in the third large stone banana at the tip of the shell.
Decompose the formation completely or follow the sonar signal until this fossil is also exposed.
During the normal climb to the top of the bowl, you are on the left side.
About halfway up is the fossil on a rocky outcrop. It is accessible from the outside and does not have to be excavated.
Go back to the big sinkhole at the construction site.
At the edge of the shaft, a fractone examines the ground. Right next to him is the fossil or the place where you have to dig.
The last fossil is also in the sinking hole of the construction site.
Get down into the shaft and examine the walls of the sinkhole. The ammonite is visible in one of the rock walls. Release him.
Using Fossils in the Clothing Store
The 30 ammonites of the Hilltop Layer can be exchanged in the clothes shop for different coat colors. Once you have collected all the fossils, the amount is exactly enough for all the exclusive offers of this layer.
- Pink fur: 2 fossils
- Lemon yellow fur: 8 fossils
- King Violet Fur: 8 fossils
- Cloud white fur: 12 fossils
Hilltop Layer Completely Completed
For a fully ticked hilltop layer, your progress indicator should show the following at the end:
- Banandium Gems: 38 / 38
- Fossils: 30 / 30
- Total: 68 / 68
Particularly easy to miss are the three jewels of wax clay after the main story is completed, the hidden room at the thorn hill, the three ammonites in the muddy hill and the four fossils on and in the third stone banana of the bowl tip.