

A Very Sticky Situation
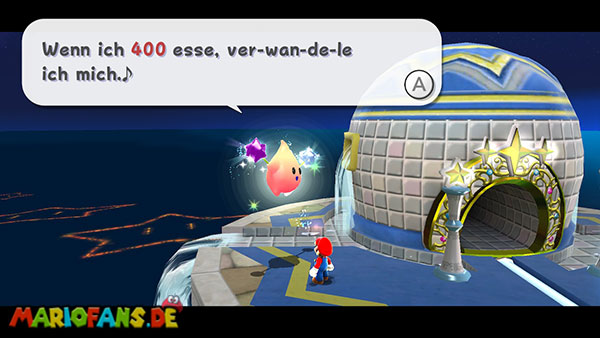
The Sling Pod Galaxy is one of the additional galaxies you can unlock by feeding a Hungry Luma. After completing the “Klebe cocoon and the king spider” mission in the Space Junk Galaxy, a hungry Luma appears in front of the comet observatory bathroom. This requires a total of 400 Star Bits before it turns into a new galaxy. Once you have collected the required amount, feed it and then use the released Launch Star to get to the Sling Pod Galaxy. Unlike in most galaxies so far, there is hardly any solid ground on which you can move freely. Instead, the entire obstacle course consists of several glue cocoons and blue Pull Stars that you must use to catapult your way through space. Along the way, numerous cannonballs, explosive mines and rotating flame traps await you. Below the entire route is a huge black hole that immediately devours you in an uncontrolled crash. Since there is no time limit for this mission, you should take a close look at which direction you need to fly and which obstacles are currently crossing your trajectory before each downing.
Immediately after your landing you will find the first glue cocoon on a small launch platform. Jump in and remember the controls you already got to know when fighting the king spider. Point the Wii Remote Hand at the cocoon, hold the A button and pull it backwards against the desired direction of flight. Once you release the button, the cocoon rushes together and catapults Mario through space like a giant slingshot. The further you pull it back, the stronger the subsequent flight will be. Therefore, focus as closely as possible on the next cocoon and avoid major lateral deviations. Already after the first launches you reach an area where several cannons regularly fire large bullets. These move across your trajectory and can throw Mario out of flight when touched. First observe the distance between the individual projectiles and only start when a sufficiently large gap opens. For one of the following cocoons, you must also pay attention to moving walls that regularly block your path. Wait until the opening is immediately in front of you, and then catapult yourself straight through it. Then it becomes even more dangerous, because on the next route four cannons fire their shells at the same time. The balls appear here in several successive rows. It is best to wait until the third series of floors has passed, because immediately afterwards a larger gap arises, which you can use for your next flight. Do not try to fly in the middle of a closed row, but rather stay a little longer in the cocoon until the path is really clear. Once you have left the last row of cannons behind you, you will reach the next section of the galaxy.
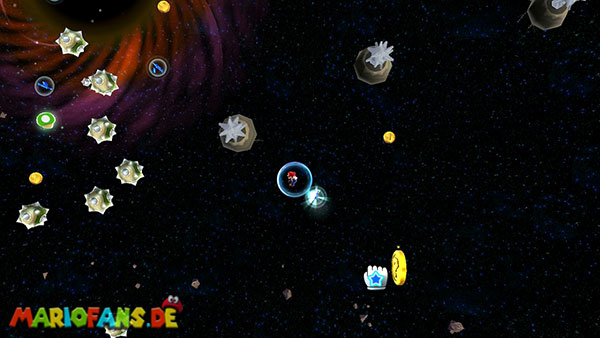
This is where locomotion changes fundamentally. Instead of the glue cocoons, you now have to use several blue grab stars to move through a large minefield. First, target the first grab star with the Wii remote and hold the A button so Mario is attracted to it. Once you are near it, you can target the nearest star and continue to be dragged through space. Between the individual Pull Stars, however, float numerous explosive mines, which detonate even with a slight touch. Particularly dangerous are the circularly arranged mines, through the center of which you have to reach the next Pull Star. Here’s a simple trick: Shoot the mines with Star Bits before you move on. As a result, they already explode from a safe distance and you can create a much larger passage. However, make sure that you are not too close to a mine when shooting down. If you accidentally encounter one of the obstacles and lose contact with a grab star, try to target another blue star immediately. With a little luck, you can catch Mario in time before he falls into the black hole. On your way through the minefield, you can also spot additional Star Bits and a 1-Up mushroom that floats a little off the direct route. To collect it, you have to use the attraction of a Pull Star and then move back towards the actual route. Those who have enough life can do without this detour, since a mistake here quickly leads to a crash. Finally, follow the Pull Stars to the opposite end of the minefield, where you again reach a glue cocoon.
In the last major section of the galaxy, you must catapult yourself from one glue cocoon to the next. This time, however, no more cannon balls await you, but several rotating flame traps consisting of interconnected fireballs. These rotate uninterruptedly around their axis and periodically block your trajectory. Even a single touch can throw Mario out of his path and plunge directly into the black hole. Therefore, first observe the direction of rotation of the flames and wait for a sufficiently large opening to form. Pull the cocoon back in the desired direction and hold the A button until the fire bars clear the way. Then you let go and fly as straight as possible to the next cocoon. Especially with the flame traps arranged one behind the other, it is important not to start too early, because you have hardly any influence on your direction during the flight. Along the way, you will also discover other Star Bits, which are partly arranged in the form of an arrow and give you the direction of flight. If possible, collect them with the pointer without being distracted by the next shoot. There is also another 1-up mushroom nearby, which you can reach with an extra, risky flight. However, returning from this position is more difficult than the actual path to the star. If you do not necessarily need an extra life, you should therefore give up the mushroom and focus on the safe connections between the cocoons. Finally, you will reach a particularly dangerous place where four rotating flame traps will cross your trajectory. Wait here until the rods turn so that their flames point away from your direction of flight. At this moment, the biggest gap between the obstacles arises. Use them to catapult you through with a strong shot and reach the last glue cocoon.
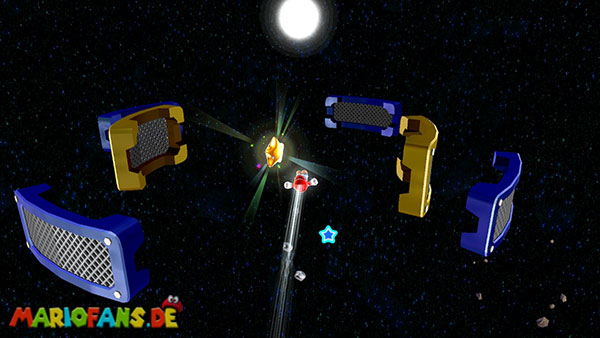
Now you can already recognize the desired Power Star before you. However, it is protected by several rotating walls, which move constantly around it and only allow a free passage for brief moments. In contrast to the previous flame traps, it is mainly important here to catch the right launch time. Jump into the last glue cocoon and align Mario as closely as possible to the star. Drag the cocoon backwards far enough for you to reach the necessary flight range and then watch the movement of the walls. As soon as the first opening appears in front of you, you should wait a moment and estimate whether the obstacles behind it will also release your trajectory. Since the barriers continue to rotate during your flight, you have to start a little earlier before the opening is right in front of the star. Let go of the A-button as soon as the movements of the walls allow for a clear distance and catapult Mario directly towards the Power Star. Avoid lateral deviations, because contact with one of the rotating walls quickly leads to a crash. Once you’ve caught the right moment, Mario flies through the opening and touches the Power Star, completing the mission immediately. So you do not have to land on a platform or reach the star again. With this, you have collected the only Power Star of the Sling Pod Galaxy and can continue your adventure in the remaining galaxies of the Comet Observatory.